5.1 What's in a form?
-
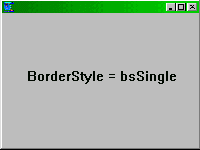
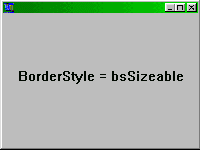
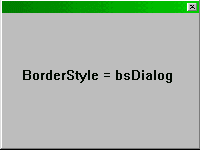
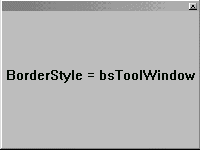
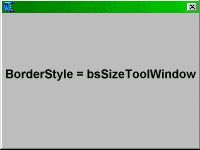
A form (or window), is a generic container that can be displayed on your desktop. It is like a panel (see QPANEL). A form can have many appearences. In Rapid-Q, the only forms which are valid, are (you can also define custom shapes for your forms, using the method SHAPEFORM):
The default form is bsSizeable. What exactly is bsNone good for? Games :-) That's right, if the form is maximized, you can utilize the whole screen for your game. It can serve other purposes as well... MSIE uses it for a full screen web browser. Looks ugly though. If you're not sure how all these variables come from, take a look at RAPIDQ.INC bsNone = 0, bsSingle = 1, etc... these variables just make programming easier, so you don't need to remember the exact number, just the variable name to use.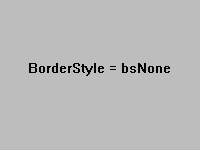
          $INCLUDE "RAPIDQ.INC"

          DIM Form AS QFORM
          Form.BorderStyle = bsDialog
          Form.ShowModal
For bsSingle, the form looks exactly like bsSizeable, except that you cannot resize the form. In many cases, the only two useful forms are bsSizeable, and bsDialog.
- 5.2 Adding components to a form
-
If you followed closely the example in the previous chapter, you can add components onto the form simply by assigning the Parent property for that component.
        DIM Form AS QForm
        DIM Button AS QButton

        Button.Parent = Form       '' Add button to form
If you're wondering why that is, just consider a program with multiple forms. All visible components must have a Parent property. Components, such as QMENUITEM, or QTIMER do not have a parent property. Even though QMENUITEM is considered a "visible" component, its parent can only be a QMAINMENU or QPOPUPMENU. But instead of assigning a Parent property, you have to Add/Insert the items to the menu. If no Parent is given, the component remains hidden. In the case of QCANVAS or QIMAGE, you will get error messages if you try to draw on the components. This is because you can't draw on something not visible. In most cases, the Parent property should be the first property you assign before doing anything else. To hide components, you can use the Visible property.
- 5.3 Tracking the mouse position on a form
- You can use MouseX and MouseY to track the position of the mouse on a form, but these 2 methods are being faded out. It is better just to handle the OnMouseMove event which pass the X and Y coordinates of the mouse position relative to the component.
- 5.4 Special events for forms
- There are a few special events that only forms can handle. The most important is the OnResize event. This occurs whenever the user has clicked on the maximize button or manually resizes your form. Your program should almost always capture this event and update the size of your controls appropriately. Imagine if your MSIE browser window was 320x200, and when you resized the application to 640x480, the browser window was still 320x200. Looks ugly, because it is. If you don't want anyone resizing your form, just use a different BorderStyle as mentioned earlier.
-
Another special event is key presses. I suggest using OnKeyDown instead of OnKeyPress. The difference is that OnKeyDown can handle extended keys, and can detect Shift, Alt, and Ctrl states. If your application does not need to handle extended keys, then by all means, use OnKeyPress instead. Keyboard handling is useful for many applications that require it, like a typing tutor, games, etc... What might be confusing is the fact that OnKeyPress and OnKeyDown return extra parameters that you can use. This deviates from most of our understanding of Events. So far we've only covered simple events that don't require any special processing.
      SUB AddButtonClick
        '' Do stuff
      END SUB

      AddButton.OnClick = AddButtonClick
A simple click only passes a simple message to our button control, telling it that a click was received. Well, for key presses, this is more complicated. It's not enough to say that a key was pressed, we have to know what key was pressed, so we have to grab this extra message.SUB KeyPressed(Key AS WORD) '' Do stuff PRINT Key END SUB Form.OnKeyPress = KeyPressedThe key pressed is returned in the variable Key. You can name this anything you want, but your SUB must have at least that one parameter. Rapid-Q won't complain if you added more parameters, nor does it complain if you don't supply any parameters. It's up to you to make sure. For OnKeyDown, there's two parameters that are passed:SUB KeyDown(Key AS WORD, Shift AS INTEGER) '' Do stuff PRINT Key;" ";Shift END SUB Form.OnKeyDown = KeyDownThere are 3 shift states, ShiftDown, AltDown, and CtrlDown. Be careful of the ShiftDown state. Unlike OnKeyPress which handled all the Shiftdown states for you, OnKeyDown will not. This means if you pressed SHIFT+i you'll have to go UCASE$(Key). Extended keys are much different in Rapid-Q than what you'd expect in a QBasic program. For example, in QBasic, the arrow keys are easy to decode:DO A$=INKEY$ IF A$=CHR$(0)+"H" THEN PRINT "Up arrow key pressed" LOOPBy using the OnKeyDown the virtual key code is returned, which is not a 2 byte code. The up arrow is Key = 38, left arrow Key = 37, right arrow Key = 39, and down arrow Key = 40
- 5.5 Dialog Boxes
-
A special type of form is a simple dialog box. Dialog boxes are usually extra interfaces to your main form. You don't usually implement a dialog box as your main form. For example, consider a main form where you have 3 choices:
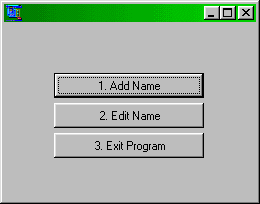
Well, for each choice (except maybe for the last), you should create dialog boxes to handle the user's input. When the user clicks on the first button, a dialog box like this should appear:
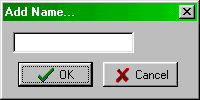
The nice buttons are custom buttons. See RAPIDQ.INC for all the values.OKButton1.Kind = bkOK CancelButton1.Kind = bkCancelFine, but how do you know if the user pressed OK or CANCEL? There's actually two ways to do this, both involve using the ModalResult property. Remember how you called your dialog box:IF Dialog1.ShowModal = mrOK THEN '' User pressed OK ELSE '' User cancelled END IFThe ModalResult is a property of both the QButtons, and QForms. When we did this:OKButton1.Kind = bkOKWe also automatically did this:OKButton1.ModalResult = mrOKWhat this means is that whenever you pressed the OK Button, the ModalResult returned is mrOK. This result automatically closes your Dialog1 form as well. Another less elegant approach is just to assign the ModalResult to your form. For example, let's assume this scenario:SUB ButtonClick Dialog1.ModalResult = mrOK END SUB OKButton1.ModalResult = mrNone '' No result OKButton1.OnClick = ButtonClickIn the above scenario, clicking on the button will transfer control to the ButtonClick SUB. In this SUB, the ModalResult property of the Dialog1 form is set, which is doing exactly the samething as our previous example.
- 5.6 Using the CREATE Method
-
In most cases, using CREATE is preferred over DIM, this is because it saves you a lot of typing, and provides a cleaner look to your source code. For starters, let's just look at how much typing it could save you:
        DIM MainForm AS QForm
            MainForm.Left = 100
            MainForm.Top = 50
            MainForm.Height = 300
            MainForm.Width = 400
            MainForm.Caption = "Hello world!"
Well, here's what the above code looks like using CREATE:CREATE MainForm AS QForm Left = 100 Top = 50 Height = 300 Width = 400 Caption = "Hello world!" END CREATEAs you can see, you don't need to type MainForm each time, since the compiler will know exactly how you want the fields to be parsed.
- 5.7 Embedding CREATEs
-
Here's where using the CREATE method over DIM will save you time and confusion. This is what I mean about "encapsulation" of your controls:
        CREATE MainForm AS QForm
           Center
           CREATE Button1 AS QButton
              Left = 10: Top = 10: Height = 20: Width = 20
           END CREATE
           ShowModal
        END CREATE
You'll probably notice that we don't need the Parent property. This is because the compiler realizes that you want to include a Button to the MainForm (due to an embedded CREATE), so it automatically generates a Button1.Parent = MainForm for you. As you can also see, it looks much better, and you can visually see what components belong to want form/container. Rapid-Q can store up to 25 layers, in the above example, we only need one layer. I don't believe people need more than 4 or 5 layers (at most), but I set 25 as the maximum just to please the 1% who really want it. As you maybe able to figure out, components without a Parent property (non-visible components) are invalid in an Embedded CREATE.
- 5.8 Creating Menus
-
Creating menus using the CREATE method is no different:
        CREATE MainForm AS QForm
           Center
           CREATE MainMenu AS QMainMenu
              CREATE FileMenu AS QMenuItem
                Caption = "&File"
                CREATE OpenItem AS QMenuItem
                  Caption = "&Open"
                END CREATE
                CREATE SaveItem AS QMenuItem
                  Caption = "&Save"
                END CREATE
              END CREATE
           END CREATE
           ShowModal
        END CREATE
Instead of the Parent property, we're saving ourselves from using AddItems. This is probably easier to understand than using DIM to define all your menus.
Prev ChapterContentsNext Chapter